Finding the perfect air fryer toast recipe is the ultimate game-changer for your morning routine, turning a simple slice of bread into a golden-brown masterpiece in just minutes. While a traditional toaster often leaves you with uneven edges or soggy centers, Air Fryer Go has mastered the science of high-velocity heat to deliver that satisfying, shatter-on-impact crunch every single time.
Whether you are reviving a buttery croissant, crisping up thick Texas toast, or making a quick batch of homemade croutons, this guide will show you exactly how to bypass the toaster and unlock the full potential of your favorite countertop appliance.
>>> Read More: The Ultimate Air Fryer Recipe Index: 101+ Easy & Healthy Ideas for Every Meal
How to Make Toast in an Air Fryer
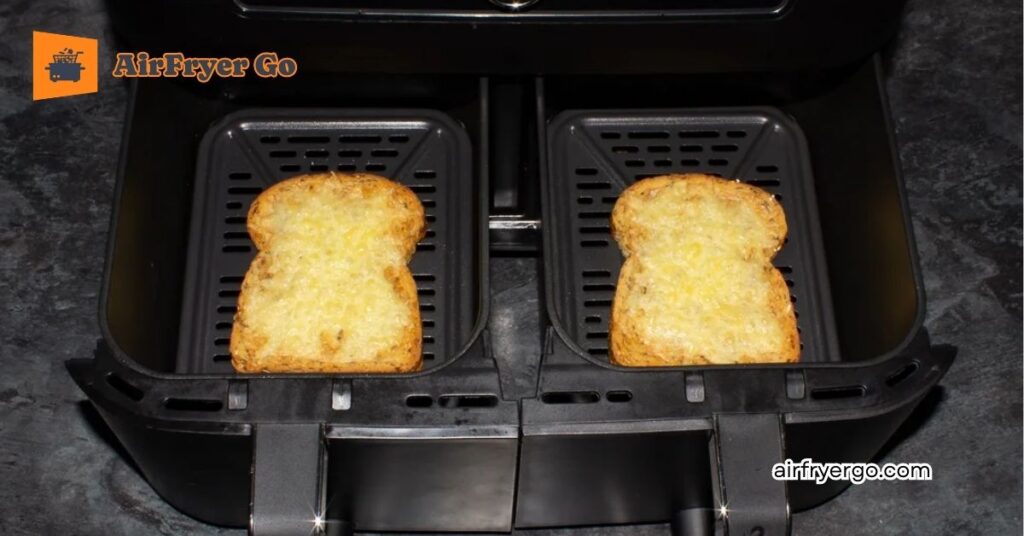
Achieving the perfect air fryer toast recipe is about more than just heating bread; it’s about using high-velocity convection to create a “shatter-on-impact” crunch that a standard toaster simply can’t match. At AirFryer Go, we’ve tested dozens of bread types to ensure you get that edge-to-edge golden finish without the dreaded soggy center.
Whether you’re using a standard basket or a Ninja Air Fryer, follow this master technique to revolutionize your breakfast.
The Core Technique: 3 Steps to Gold
1. The Prep (Butter vs. Dry)
For the ultimate flavor, we recommend a thin, even layer of softened salted butter or a quick spray of avocado oil before cooking. The fat helps conduct heat and creates a more uniform Maillard reaction (that beautiful brown crust).
- Pro Tip: If you’re using light sandwich bread, place a small metal cooling rack over the slices to prevent the air fryer fan from sucking the bread up into the heating element.
2. Temperature & Timing
Set your air fryer to 350°F (175°C). Unlike a traditional oven, you don’t necessarily need a long preheat, but 2 minutes of warming up will give you a more consistent result.
- Standard Bread: 3–4 minutes.
- Frozen Bread: 5–6 minutes (no need to thaw!).
>>> Read More: The Ultimate Air Fryer Temps & Times Masterclass
3. The “Flip” Alert
Halfway through the cooking time (usually at the 2-minute mark), open the basket and flip the bread. This ensures the bottom—which gets less direct airflow—reaches the same level of crispness as the top.
Specialty Toasting: Texas Toast & Bagels
- Texas Toast in the Air Fryer: Because Texas toast is double-thick, use a slightly higher heat (380°F). This ensures the exterior crisps up before the interior dries out.
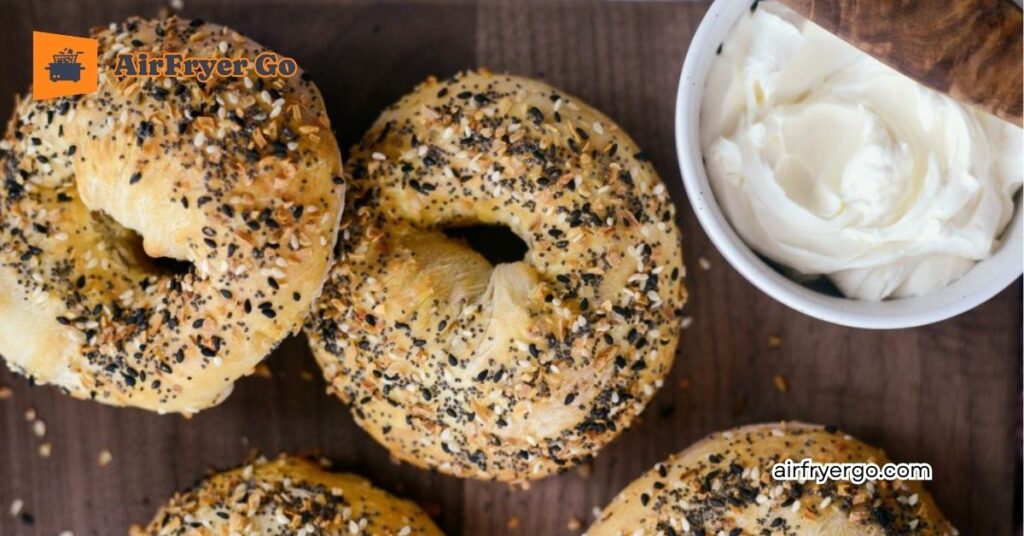
- How to Toast Bagels: Always place bagels cut-side up. The air fryer excels here because it crisps the “innards” of the bagel while keeping the outer crust from becoming too hard to bite.
Expert Summary: The Secret to Success
The biggest mistake people make is treating the air fryer like a microwave. AirFryer Go experts suggest checking your toast 1 minute before the timer ends. Because air fryers are compact, the transition from “perfectly toasted” to “burnt” happens in about 30 seconds.
The Air Fryer Bread & Toast “Cheat Sheet”
For the ultimate kitchen efficiency, AirFryer Go has standardized these settings based on the 1700W power profile of top-tier machines like the Instant Pot Vortex and Ninja Air Fryer.
Whether you’re making a quick air fryer toast recipe for a busy Monday or reviving a weekend croissant, use this cheat sheet to eliminate the guesswork.
The AirFryer Go Master Calibration Table
| Bread Variety | Temp (°F) | Time (Mins) | Flip Required? | The “Done” Look |
| Standard White/Wheat | 350°F | 3–4 | Yes (at 2 mins) | Uniform golden brown. |
| Sourdough (Rustic) | 370°F | 4–5 | Yes | Charred edges, chewy center. |
| Texas Toast (Thick) | 380°F | 5–6 | Yes | Deep gold, buttery sheen. |
| Bagels (Cut-side up) | 360°F | 3–5 | No | Crunchy top, soft base. |
| English Muffins | 370°F | 4–5 | No | Toasted nooks and crannies. |
| Croissants (Reheat) | 320°F | 2–3 | No | Flaky, warm, buttery layers. |
| Frozen Waffles/Bread | 350°F | 5–6 | Yes | C |
Expert Tips for Cheat Sheet Success
1. The “Golden” Rule of 350°F
If you aren’t sure which setting to use for a new bread type, 350°F (175°C) is your safe harbor. It is hot enough to crisp the starch without burning the natural sugars in the bread too quickly.
2. Ninja Air Fryer Adjustments
If you are using a Ninja Air Fryer, their fans tend to be more powerful than average. We recommend reducing the times above by 30–60 seconds or checking the basket a minute early to prevent over-browning.
3. The Moisture Factor
Fresh, artisanal bread (like a bakery Sourdough) has higher moisture content than pre-sliced supermarket bread. It may require an extra minute at a slightly higher temperature (370°F) to achieve that professional-grade crust.
4. Don’t Crowd the Basket
For the EvenCrisp™ technology to work, air must flow around the bread. If you overlap slices, you’ll end up with “steamed” white patches rather than a consistent toast. Keep it to a single layer!
Quick Troubleshooting
- Bread is flying around: Use a small metal rack or a toothpick to weigh down light slices.
- Edges are burning: Lower the temp by 20°F and add 1 minute to the timer.
- Too dry/crouton-like: You likely cooked it at too low a temperature for too long. High and fast is the key to a soft-centered toast!
Special Techniques: From Texas Toast to Bagels
While a standard slice of bread is straightforward, specialty breads require a more nuanced approach to heat and airflow. To master the air fryer toast recipe for thicker or denser varieties, you need to understand how the EvenCrisp™ technology interacts with different crumb structures.
At AirFryer Go, we’ve refined these specific techniques to ensure your Texas toast stays plush and your bagels stay chewy.
1. Texas Toast in the Air Fryer
Texas toast is double-thick, which means the “outside-in” heating of an air fryer can sometimes leave the middle cold if the temperature is too high.
- The Technique: Set your Vortex or Ninja to 375°F (190°C).
- The Secret: Generously butter both sides before putting it in. The fat acts as a heat conductor, driving the temperature into the center of the thick slice.
- Timing: 5–6 minutes, flipping at the 3-minute mark. You are looking for a deep, mahogany gold.
2. How to Toast Bagels in Air Fryer
The biggest mistake people make with bagels is toasting them whole. To get that iconic NYC deli texture, you need a targeted heat strike.
- The Technique: Slice the bagel and place both halves cut-side up in the basket.
- The Setting: 360°F (182°C) for 3–5 minutes.
- Why it works: Unlike a toaster that heats both sides, the air fryer’s top-down heat crisps the “innards” while the bottom of the bagel stays soft and steamy. No flipping is required here!
3. Air Fryer Croissants & Crescent Rolls
These are the “divas” of the bread world—high fat and very delicate. If you use the standard toast setting, they will burn in sixty seconds.
- The Technique: Use the Bake or Roast mode at a lower 320°F (160°C).
- The Goal: You aren’t “cooking” them; you are revitalizing the butter. 2–3 minutes is all it takes to make a day-old croissant taste like it just left a Parisian bakery.
- Pro Tip: If they have a sugar glaze, check them every 60 seconds. Sugar carbonizes (burns) rapidly in the Vortex airflow.
The Specialty Bread “Quick-Reference”
| Bread Type | Heat Level | AirFryer Go Pro-Tip |
| Texas Toast | High (375°F) | Butter both sides for a “fried bread” finish. |
| Bagels | Medium (360°F) | Face-up only; do not flip. |
| Croissants | Low (320°F) | Great for “refreshing” store-bought rolls. |
| Crescent Rolls | Low (320°F) | Tent with foil if the tips brown too fast. |
Expert Summary: The “Density” Rule
The denser the bread, the lower the temperature should be. A heavy, seeded bagel needs time for the heat to penetrate, whereas a light, airy croissant needs a quick “kiss” of heat to crisp the outer layers. Always prioritize airflow—never stack specialty breads, or you’ll lose the texture that makes them special.
The “Zero Waste” Bonus: 5-Minute Air Fryer Croutons
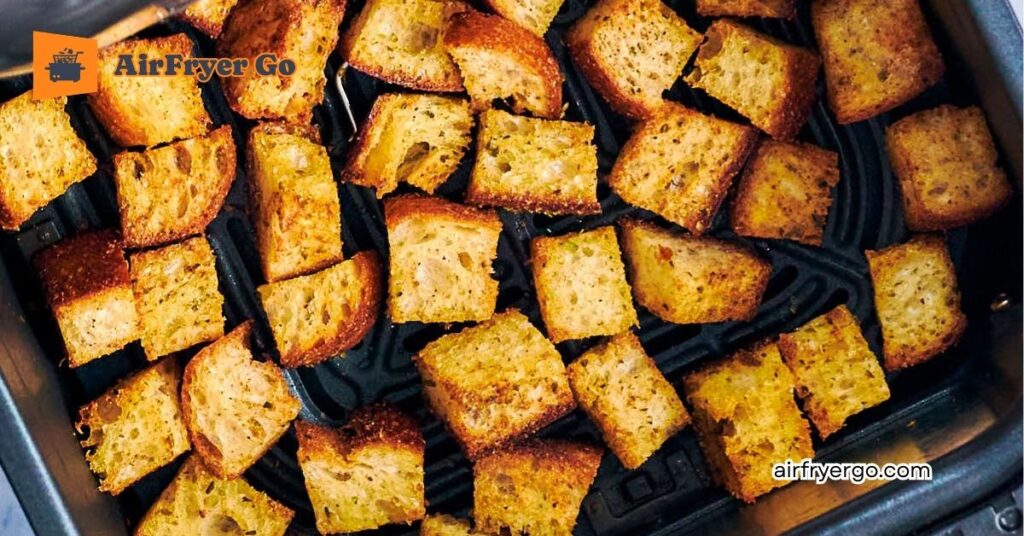
Stop throwing away those dry bread heels or the leftover crusts from your kids’ sandwiches. At AirFryer Go, we believe the air fryer is the ultimate “upcycling” tool. Transforming stale bread into gourmet croutons in the air fryer takes less time than preheating your oven, and the crunch is vastly superior to anything in a bag.
The Method: From Stale to Stellar
- Cube It: Cut your leftover bread (Sourdough, French bread, or even standard white slices) into 1-inch cubes. Irregular edges are actually better—they catch more oil and get extra crispy.
- The Toss: In a bowl, toss the cubes with 1–2 tablespoons of olive oil or melted butter.
- Seasoning: Sprinkle with garlic powder, dried parsley, and a pinch of sea salt. For a “Caesar Style” kick, add a tablespoon of grated Parmesan cheese.
- The Blast: Place in the air fryer basket in a single layer.
The AirFryer Go Settings
- Mode: Air Fry
- Temp: 390°F (198°C)
- Time: 4–6 mins
- The Secret: Shake the basket every 2 minutes. Because croutons are small and light, they can burn in the blink of an eye once they hit the “golden” stage.
3 Gourmet Flavor Variations
| Flavor Style | Add These to the Toss | Best For |
| Garlic Herb | Garlic powder + Rosemary + Thyme | Tomato Soup or Garden Salads. |
| Spicy Chili | Smoked Paprika + Cayenne + Lime Zest | Black Bean Soup or Taco Salads. |
| Cheesy Pesto | 1 tsp Pesto sauce + Parmesan | Italian Wedding Soup or Minestrone. |
Expert Summary: The “Stale Bread” Hack
The dryer the bread, the better the crouton. If your bread is still fresh and soft, air fry it at 300°F for 2 minutes first to dehydrate it slightly before adding the oil and seasonings. This ensures the oil sits on the surface to create a “fried” crunch rather than soaking into the bread and making it heavy.
Device Spotlight: Ninja Air Fryer Toast Settings
>>> Read More: 20+ Ninja Air Fryer Recipes: Master Your DualZone & Foodi
While the Instant Pot Vortex is known for its “EvenCrisp” precision, the Ninja Air Fryer series (including the Foodi, Max XL, and DoubleStack) is the powerhouse of the air frying world. Because Ninja units typically feature a high-RPM fan, they circulate heat faster than almost any other brand.
At AirFryer Go, we’ve found that a standard air fryer toast recipe needs a slight “Ninja Adjustment” to prevent your breakfast from turning into a charcoal brick.
The “Ninja Adjustment” Rules
If you are using a Ninja, follow these three specific tweaks to account for its intense convection power:
1. Lower the Temp by 10–20°F
If a general recipe calls for 350°F, set your Ninja to 330°F or 340°F. The fan speed in Ninja units is so high that it can “flash-cook” the surface of the bread before the heat reaches the center.
2. The “30-Second” Shave
Ninja units reach peak temperature almost instantly. Always check your toast 30 to 60 seconds earlier than you would in a basket-style Vortex or a toaster oven.
3. The Ninja “Fly-Away” Fix
Because Ninja fans are exceptionally strong, light slices of white bread or brioche will fly up and hit the heating element.
- The Fix: Use the Ninja multi-layer rack (if included) to “sandwich” the bread down, or simply place a small stainless steel spoon on top of the slice to weigh it down.
Ninja-Specific Toasting Chart
| Model | Recommended Temp | Time (Standard Slice) | AirFryer Go Tip |
| Ninja Foodi (6-in-1) | 340°F | 3 mins | Flip at 1.5 mins for even color. |
| Ninja Max XL | 325°F | 3–4 mins | Use the “Air Broil” for 1 min for extra crunch. |
| Ninja Foodi Grill | 350°F | 2–3 mins | The heavy grate gives great grill marks! |
| Ninja DoubleStack | 340°F | 3 mins | Perfect for toasting 4+ slices at once. |
The “Air Broil” Secret (Ninja Only)
If your Ninja has an Air Broil or Max Crisp setting, you can achieve a “Diner-Style” finish.
- Toast your bread on the Air Fry setting for 2 minutes.
- Switch to Air Broil for the final 45 seconds. This creates a micro-thin, glass-like crunch on the surface while keeping the inside as soft as a cloud.
Expert Summary: Mastering the Power
The Ninja is a beast of a machine. It’s perfect for Texas toast in the air fryer because it can handle the thickness with ease, but it can be “bullish” with delicate white bread. Always err on the side of a lower temperature; you can always add a minute, but you can’t “un-burn” a bagel!
Troubleshooting: Common Toasting Mistakes
Even with the best air fryer toast recipe, things can occasionally go sideways. Because air fryers use high-velocity fans and compact heating chambers, the margin for error is smaller than a traditional oven.
At AirFryer Go, we’ve diagnosed the most common “toast tragedies” so you don’t have to waste a single loaf.
1. The “Flying Bread” Mystery
- The Problem: You hear a scratching sound, followed by the smell of burning. Your light slice of white bread has been sucked up into the heating element.
- The Fix: This is common in powerful units like the Ninja Air Fryer. Weight your bread down with a small stainless steel spoon, or place a metal steaming rack over the slices to keep them grounded while the EvenCrisp™ air circulates.
2. The “Cardboard” Texture (Dry & Hard)
- The Problem: Your toast isn’t just crunchy; it’s dehydrated and hard to bite.
- The Fix: You likely cooked the bread for too long at too low a temperature (e.g., 300°F for 8 minutes). To keep the center soft, you need a “Heat Shock.” Crank the heat to 375°F and shorten the time to 3 minutes. This sears the outside before the inside loses its moisture.
3. The “Ghost Toast” (Pale Bottoms)
- The Problem: The top is a beautiful mahogany brown, but the bottom is white and soft.
- The Fix: Air fryers heat primarily from the top. While the mesh basket helps, you must flip the bread halfway through the cycle. If you’re toasting something dense like Texas toast in the air fryer, flipping is mandatory for that 360-degree crunch.
4. The “Smoke Show”
- The Problem: Acrid blue smoke is billowing from the back of the unit.
- The Fix: Check the bottom of your basket. Crumbs from previous toast cycles or oil from a greasy breakfast can settle and burn.
- AirFryer Go Tip: Wipe out the “crumb tray” or the bottom of the outer basket after every 3–4 uses to prevent flavor contamination and smoke.
The Troubleshooting “Quick-Fix” Guide
| Symptom | Likely Cause | The AirFryer Go Solution |
| Burnt Edges, Raw Middle | Temp too high | Drop temp by 20°F; add 1 minute. |
| Soggy/Limp Toast | Overcrowding | Cook in a single layer; leave 1-inch gaps. |
| Uneven Browning | Blocked Airflow | Don’t use solid foil; use perforated parchment. |
| Bơ (Butter) Smoking | Low Smoke Point Oil | Use Avocado Oil or salted butter (avoid margarine). |
Expert Summary: The “Watchful Eye”
The final 60 seconds of any air fryer bread recipe are the most critical. Because the basket is small, the heat builds exponentially. If you see wisps of steam turning into dark brown edges through the ClearCook window, pull the basket immediately. Carry-over heat will finish the job!
Expert Tips for the Best Air Fryer Bread
To move beyond “basic toast” and achieve bakery-quality results, you need to understand the physics of convection. At AirFryer Go, we’ve spent hundreds of hours testing the limits of the EvenCrisp™ system. These expert-level hacks will help you master every air fryer bread recipe, from a simple morning slice to a sophisticated sourdough.
1. The “Steam Hack” for Artisanal Crust
If you are toasting high-quality sourdough or crusty French bread, the dry air of an air fryer can sometimes make the crust too hard.
- The Pro Move: Place 1 teaspoon of water in the corner of the air fryer basket (not on the bread!). As the unit heats up, it creates a small burst of steam that keeps the starch on the surface flexible just long enough to expand, resulting in a thin, crackly crust rather than a thick, tooth-shattering one.
2. The “Pre-Fat” Rule
Should you butter your bread before or after? For the best air fryer toast recipe, the answer is before.
- The Science: Fat is a superior heat conductor. Spreading a thin layer of softened salted butter or brushing on olive oil before air frying creates a deep, even mahogany color that “dry” toasting can’t replicate. It also prevents the bread from drying out into a crouton-like texture.
3. The Frozen Bread “Shock”
Don’t bother thawing your bread. Air fryers are the absolute best way to revive frozen slices.
- The Technique: Take the bread straight from the freezer to the basket. Set your Vortex or Ninja to 350°F. The high-speed fan will defrost the moisture and crisp the surface simultaneously.
- The Timing: Add exactly 60–90 seconds to the standard cook time.
4. Salt Your Toast (Yes, Really)
This is the “Chef’s Secret” for the ultimate breakfast.
- The Move: Immediately after the basket pops open, while the butter is still bubbling on the surface of your air fryer toasted bread, hit it with a tiny pinch of Maldon sea salt or flaky salt. It elevates the wheat flavors and makes even cheap white bread taste like a gourmet treat.
The “Best Bread” Quick-Check
| Goal | The AirFryer Go Expert Move |
| Max Crunch | Use the “Air Broil” setting for the last 45 seconds. |
| Soft & Steamy | Lower the temp to 330°F and wrap in foil for 1 min after cooking. |
| No-Burn Bagels | Only toast the cut-side; leave the “round” side alone. |
| Savory Finish | Rub a raw clove of garlic on the toast after it comes out. |
Expert Summary: The “Resting” Period
Just like a steak, high-heat toast benefit from a 30-second rest. When you pull your air fryer toast out, place it on a wire rack—not a flat plate. If you put hot toast on a cold plate, the steam trapped underneath will turn your crispy bottom into a soggy mess within seconds. Always let it breathe!
Conclusion: Your Morning Revolution Starts Here
Mastering the perfect air fryer toast recipe is more than just a convenience—it’s a total upgrade to your daily ritual. By moving away from the inconsistent heat of a traditional toaster and embracing the precision of EvenCrisp™ technology, you’ve unlocked a world of “shatter-on-impact” textures and gourmet finishes. From buttery Texas toast in the air fryer to artisanal croutons, your countertop appliance is now your most powerful breakfast ally.
Ready to keep the crunch going?
- Bookmark the Cheat Sheet: Save our AirFryer Go Master Calibration Table so you never have to guess the timing for your sourdough or bagels again.
- Share Your Success: We love seeing your golden-brown creations! Tag your breakfast photos with #AirFryerGo on social media to join our community of high-performance home cooks.
- Explore More Mastery: This is just the beginning of what your machine can do. Visit the official AirFryer Go website for more expert-tested guides, deep-dive equipment reviews, and “Zero Waste” hacks that turn everyday ingredients into extraordinary meals.
Stop settling for soggy bread and start crisping with confidence. Welcome to the future of breakfast with AirFryer Go.
Recommended next reads:
15 Easy Air Fryer Breakfast Recipes For Your Busy Mornings
10+ Easy Air Fryer Desserts That Taste Better Than the Oven
20 Air Fryer Fries Recipes: From Classic Potato to Crispy Veggie Delights